Project 19: Building and Deploying Serverless Architectures with AWS SAM and CI/CD (Step by Step Implementation)
Introduction:
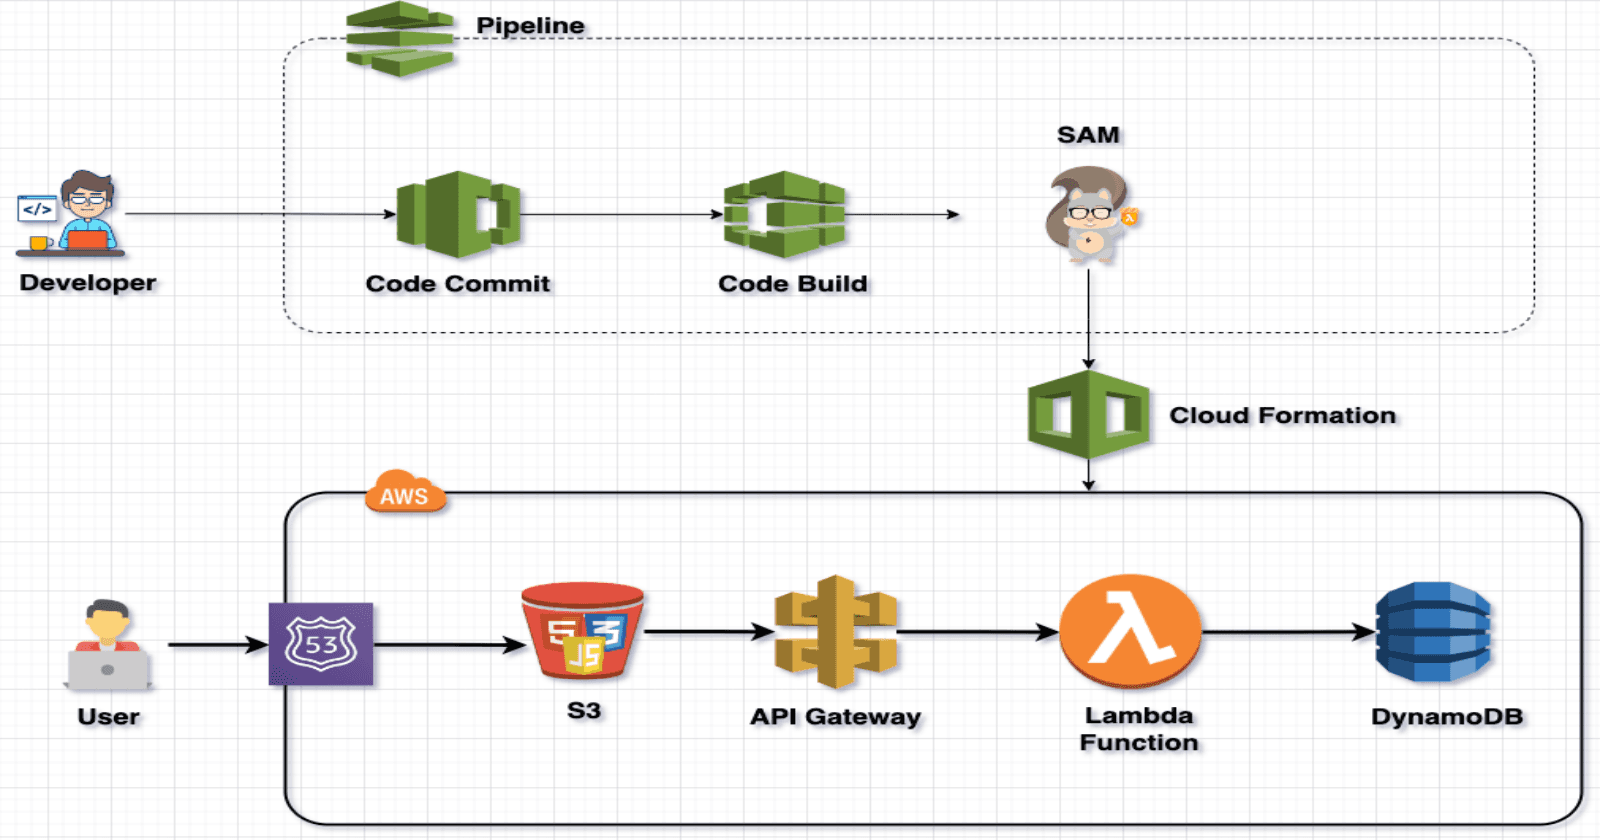
This project simplifies and streamlines the development and deployment of Serverless Architectures using AWS SAM (Serverless Application Model) and CI/CD practices. By combining the power of AWS SAM with a robust CI/CD pipeline, the project addresses common challenges in serverless development, such as efficient management of AWS resources, seamless integration with API Gateway and DynamoDB, and the automation of deployment processes. With SamServeCI, developers can enjoy a smooth and automated workflow, ensuring rapid iteration, reliable deployments, and optimal performance of serverless applications.
Technologies Used in This Project:
AWS SAM (Serverless Application Model): AWS SAM is utilized to define and deploy serverless applications on AWS. It simplifies the process of defining serverless resources such as AWS Lambda functions, API Gateway APIs, and DynamoDB tables. In this project, AWS SAM provides a standardized and efficient way to define the serverless architecture.
AWS Lambda (Python): AWS Lambda, with Python as the runtime, is employed for executing serverless functions. Python offers a versatile and developer-friendly environment, making it an excellent choice for building the serverless components of the application. It allows for modular, scalable, and easy-to-maintain code.
Amazon API Gateway: Amazon API Gateway is used to create, publish, and manage APIs at scale. It acts as the frontend for serverless applications, handling HTTP requests and seamlessly connecting them to AWS Lambda functions. API Gateway ensures secure and efficient communication between clients and the serverless backend.
Amazon S3 (Simple Storage Service): Amazon S3 is employed to store and retrieve static assets, such as the web application's frontend files. It provides a scalable and durable storage solution, enabling efficient content delivery and storage for the serverless blog application.
Amazon DynamoDB: Amazon DynamoDB serves as the NoSQL database for storing dynamic data in this project. It offers seamless scalability and low-latency access, making it well-suited for managing blog posts, user data, and other dynamic content in a serverless architecture.
AWS CodePipeline: AWS CodePipeline is utilized for orchestrating the CI/CD workflow. It automates the build, test, and deployment phases of the serverless application. CodePipeline enhances development agility by providing a continuous delivery pipeline that integrates with other AWS services.
AWS CodeBuild: AWS CodeBuild is employed for building and packaging the serverless application artifacts. It offers a fully managed build service, ensuring consistent and reproducible builds. CodeBuild integrates seamlessly with other AWS services, facilitating a streamlined CI/CD process.
AWS CodeCommit: AWS CodeCommit is used as the version control repository for storing and managing the source code of the serverless application. It provides a secure and scalable Git-based version control system, supporting collaborative development and code sharing within the project.
Prerequisites:
Before diving into the ServerlessBlog project, ensure you have the following prerequisites in place:
AWS Account: A valid AWS account is necessary to leverage cloud services like Lambda, API Gateway, S3, and DynamoDB.
Domain Name: Obtain a domain name for your blog, as it will be essential for securing and accessing your ServerlessBlog through a custom web address.
Basic HTML, Bootstrap, and jQuery Knowledge: Familiarity with HTML for structuring web content, Bootstrap for responsive design, and jQuery for enhanced front-end interactivity is recommended for a smoother development experience.
Python Skills: Understanding of Python programming language is crucial as it powers the serverless functions implemented using AWS Lambda.
Project Overview:

Project:
We will be using this project repo: https://github.com/patelajay745/SAM-project
Step-1 : Create CodeCommit Repo
Navigate to AWS CodeCommit through the AWS Console and select "Create repository."

Assign a name to the repository and click "Create."

To generate Git credentials, refer to the following link:
Now Copy the Git link provided in CodeCommit.

Now, proceed to clone the repository from GitHub to your local machine.
https://github.com/patelajay745/SAM-project
Open the cloned folder in the terminal and enter the following command:
git remote set-url origin <CodeCommit repository URL>

Run the following commands:
git add .
git commit -m "All Files are added"
git push
It will prompt for the Git ID and password that you created earlier.

Now Goto Project Folder > sam-project then edit template.yaml
Change then name of the S3 Buckets . Set it to your domain or subdomain name. It should be unique. (There will be multiple places where it is written, so make sure you update all.)

Now edit buildspec.yml in same folder. Update the S3 name and region in code.

Step-2 : Setup CodeBuild
Navigate to CodeBuild on the AWS Console.

Provide a name for the project. Select "AWS CodeCommit" as the source provider, and then choose the repository.

Configure the environment as shown below.

Opt for "New service role," and then select "Use a buildspec file," providing the path as illustrated below.

Click on "Create build Project". Now we need to add some permission, to execute and deploy our Serverless infrastructure. Click on service role as shown below.

It will open new tab. Click on Add permissions > Attach policies.

Add Following permissions.and close tab.

Click on "Start build"

click on trail log to see more details. It will take time to build everything.

and if see the log you will find url, which we need further.

Step 3: Update database and all the urls in html code.
Navigate to DynamoDB on console. Click on tables. you will see two tables. click on Login table.

Click on "Actions" and Click on "Create item"

add username and password. but make sure you entered exact "password" as attributes name. click on "Create item"

This is Problem now * (Don't worry, I have solution for that, but it is manual , If you know why it is happening then please comment below with solution.)
To make every ApiGateway work, You need to do this.
Navigate to APIGateway in AWS Console.

Click on every method(* POST, DELETE,GET,OPTIONS,POST,PUT one by one). Click on Integration request

Click on Edit.

Just click on "Save". Nothing to edit.

Repeat this for every methods.

Then click on "Deploy API". Select stage and click on "Deploy"

Now Check your Cloned repo in your computer.
In website folder, open following files,
add-post.html , edit-post.html , index.html . Search for "fetch(" and paste your api gateway Invoke url.
fetch('<ur invoke url>/ManageBlogPost', {

For edit-post.html
fetch('<ur invoke url>/ManageBlogPost?postId=${postId}', {

for index.html
fetch('<ur invoke url>/ManageBlogPost', {

Now change to show-post.html
fetch('<ur invoke url>/ManageBlogPost?postId=${postId}', {

Now at last, make 3 changes in admin.html
search for "amazonaws"
fetch('<ur invoke url>/ManageBlogPost', {

fetch('<ur invoke url>/ManageBlogPost?postId=${postId}', {

<ur invoke url>login?username=
Here make sure you enter login instead of ManageBlogPost

Step 4: Setup Codepipeline.
Navigate to CodePipeline in AWS Console. Click on "Create Pipeline"

provide the name of pipeline and click on "Next"

Select "AWS CodeCommit" as Source provider. Choose Repository name and branch name. For output select "Full clone". Click on "Next"

Select "AWS CODEBuild" as build provider. Choose Project name.Click "Next"

Click on "Skip deploy stage" for deploy stage.

Review it and Click on "Create Pipeline". It will start building the pipeline.
After few minutes , your pipeline will be finish successfully.

Step 5: Final Step. Setup DNS for domain in Route53
Navigate to Route 53 and Click on your domain name.

Click on "Create record"

Write "www" if you are not using sub domain. I am using subdomain so I am writing subdomain name.
Select "A Record" as Record type.
Select "Alias".
Choose Endpoint to "Alias to 53 website endpoint"
Choose region to "Region of S3 bucket"
Your s3 Endpoint will pop up.
Click on "Create Records"

Now If you ope url of your domain then you will see your Serverless Application running.

To login and add post , Click on "Admin panel" from Menu. It will ask for username and password. Enter username and password which you entered in dynamodb table.
Click on "Add Post" Bingo your Serverless blog is ready to use.
If you are encountering problem then make sure your s3 name and allowed origin are same.

Now whenever there is push in CodeCommit, our pipeline will trigger automatically.

If you want to learn SAM then go through this file.How I create Serverless infrastructure.
AWSTemplateFormatVersion: "2010-09-09"
Transform: AWS::Serverless-2016-10-31
Description: >

Globals:
  Function:
    Timeout: 3
    MemorySize: 128

    LoggingConfig:
      LogFormat: JSON
Resources:
  # All Lambda function
  ManageBlogPostFunction:
    Type: AWS::Serverless::Function
    Properties:
      CodeUri: ../lambda/ManageBlog
      Handler: ManageBlogPostFunction.lambda_handler
      Runtime: python3.8
      Architectures:
        - x86_64
      Environment:
        Variables:
          BLOG_TABLE: !Ref BlogPostsTable
          S3_NAME: myserverlesblog01.ajayproject.com
      Policies:
        - DynamoDBCrudPolicy:
            TableName: !Ref BlogPostsTable
        - S3FullAccessPolicy:
            BucketName: !Ref ServerlessBlogS3Bucket

  LoginFunction:
    Type: AWS::Serverless::Function
    Properties:
      CodeUri: ../lambda/Login
      Handler: login.lambda_handler
      Runtime: python3.8
      Architectures:
        - x86_64
      Environment:
        Variables:
          LOGIN_TABLE: !Ref LoginTable
      Policies:
        - DynamoDBCrudPolicy:
            TableName: !Ref LoginTable

  # ALL DynamoDB table
  BlogPostsTable:
    Type: AWS::Serverless::SimpleTable
    Properties:
      PrimaryKey:
        Name: postId
        Type: String

  LoginTable:
    Type: AWS::Serverless::SimpleTable
    Properties:
      PrimaryKey:
        Name: username
        Type: String

  # IAM Roles
  DynamoDBCrudPolicy:
    Type: AWS::IAM::Policy
    Properties:
      PolicyName: DynamoDBCrudPolicy
      PolicyDocument:
        Version: "2012-10-17"
        Statement:
          - Effect: Allow
            Action:
              - dynamodb:PutItem
              - dynamodb:GetItem
              - dynamodb:UpdateItem
              - dynamodb:DeleteItem
              - dynamodb:Scan
              - dynamodb:Query
            Resource: !Sub "arn:aws:dynamodb:${AWS::Region}:${AWS::AccountId}:table/${LoginTable}"

          - Effect: Allow
            Action:
              - dynamodb:PutItem
              - dynamodb:GetItem
              - dynamodb:UpdateItem
              - dynamodb:DeleteItem
              - dynamodb:Scan
              - dynamodb:Query
            Resource: !Sub "arn:aws:dynamodb:${AWS::Region}:${AWS::AccountId}:table/${BlogPostsTable}"
      Roles:
        - Ref: ManageBlogPostFunctionRole
        - Ref: LoginFunctionRole

  # S3 Bucket
  ServerlessBlogS3Bucket:
    Type: AWS::S3::Bucket
    Properties:
      BucketName: myserverlesblog01.ajayproject.com
      PublicAccessBlockConfiguration:
        BlockPublicAcls: false
        BlockPublicPolicy: false
        IgnorePublicAcls: false
        RestrictPublicBuckets: false
      WebsiteConfiguration:
        IndexDocument: index.html

  # S3 Bucket Policy
  ServerlessBlogS3BucketPolicy:
    Type: AWS::S3::BucketPolicy
    Properties:
      Bucket: !Ref ServerlessBlogS3Bucket

      PolicyDocument:
        Version: "2012-10-17"
        Id: "Policy1707666026999"
        Statement:
          - Sid: "Stmt1707666025128"
            Effect: "Allow"
            Principal: "*"
            Action: "s3:GetObject"
            Resource: !Sub "arn:aws:s3:::${ServerlessBlogS3Bucket}/*"

  #API Gateway
  ServerlessBlogAPIGateway:
    Type: AWS::Serverless::Api
    Properties:
      StageName: v1
      OpenApiVersion: "2.0"
      DefinitionBody:
        swagger: "2.0"
        info:
          title: "ServerlessBlogAPIGateway"
          version: "1.0"
        paths:
          /login:
            post:
              responses:
                "200":
                  description: "Successful response"
                  schema:
                    $ref: "#/definitions/Empty"
              x-amazon-apigateway-integration:
                uri:
                  Fn::Sub: arn:aws:apigateway:${AWS::Region}:lambda:path/2015-03-31/functions/${LoginFunction.Arn}/invocations
                responses:
                  default:
                    statusCode: "200"
                httpMethod: "POST"
                type: aws_proxy
          /ManageBlogPost:
            get:
              responses:
                "200":
                  description: "Successful response"
                  schema:
                    $ref: "#/definitions/Empty"
              x-amazon-apigateway-integration:
                uri:
                  Fn::Sub: arn:aws:apigateway:${AWS::Region}:lambda:path/2015-03-31/functions/${ManageBlogPostFunction.Arn}/invocations
                responses:
                  default:
                    statusCode: "200"
                httpMethod: "GET"
                type: aws_proxy
            post:
              responses:
                "200":
                  description: "Successful response"
                  schema:
                    $ref: "#/definitions/Empty"
              x-amazon-apigateway-integration:
                uri:
                  Fn::Sub: arn:aws:apigateway:${AWS::Region}:lambda:path/2015-03-31/functions/${ManageBlogPostFunction.Arn}/invocations
                responses:
                  default:
                    statusCode: "200"
                httpMethod: "POST"
                type: aws_proxy
            delete:
              responses:
                "200":
                  description: "Successful response"
                  schema:
                    $ref: "#/definitions/Empty"
              x-amazon-apigateway-integration:
                uri:
                  Fn::Sub: arn:aws:apigateway:${AWS::Region}:lambda:path/2015-03-31/functions/${ManageBlogPostFunction.Arn}/invocations
                responses:
                  default:
                    statusCode: "200"
                httpMethod: "DELETE"
                type: aws_proxy
            put:
              responses:
                "200":
                  description: "Successful response"
                  schema:
                    $ref: "#/definitions/Empty"
              x-amazon-apigateway-integration:
                uri:
                  Fn::Sub: arn:aws:apigateway:${AWS::Region}:lambda:path/2015-03-31/functions/${ManageBlogPostFunction.Arn}/invocations
                responses:
                  default:
                    statusCode: "200"
                httpMethod: "PUT"
                type: aws_proxy
      Cors:
        AllowMethods: "'POST,OPTIONS,GET,DELETE'"
        AllowHeaders: "'Content-Type,X-Amz-Date,Authorization,X-Api-Key,X-Amz-Security-Token'"
        AllowOrigin: "'http://myserverlesblog01.ajayproject.com'"

  ApplicationResourceGroup:
    Type: AWS::ResourceGroups::Group
    Properties:
      Name:
        Fn::Sub: ApplicationInsights-SAM-${AWS::StackName}
      ResourceQuery:
        Type: CLOUDFORMATION_STACK_1_0

Outputs:
  LoginApiUrl:
    Description: "URL for the Login API"
    Value:
      Fn::Sub: "https://${ServerlessBlogAPIGateway}.execute-api.${AWS::Region}.amazonaws.com/v1/"
For added security, we have configured the Lambda function to match the origin, ensuring that only requests from our specified domain can access the API Gateway.
**
Conclusion 🚀:**
In conclusion, this project harmonizes AWS SAM with CI/CD practices, offering a streamlined and efficient path to serverless development. Bridging the gap between architecture complexity and deployment simplicity, it empowers developers to navigate the serverless landscape with ease. With rapid iterations, secure deployments, and optimal performance, this project is a testament to the future of serverless architecture. Embrace the journey towards efficient and reliable serverless development! 🌐💻✨


