Project 18: Serverless Blog : Seamless Content Management with AWS Lambda (Python), API Gateway, S3, and DynamoDB (Step by Step Implementation)
Introduction:
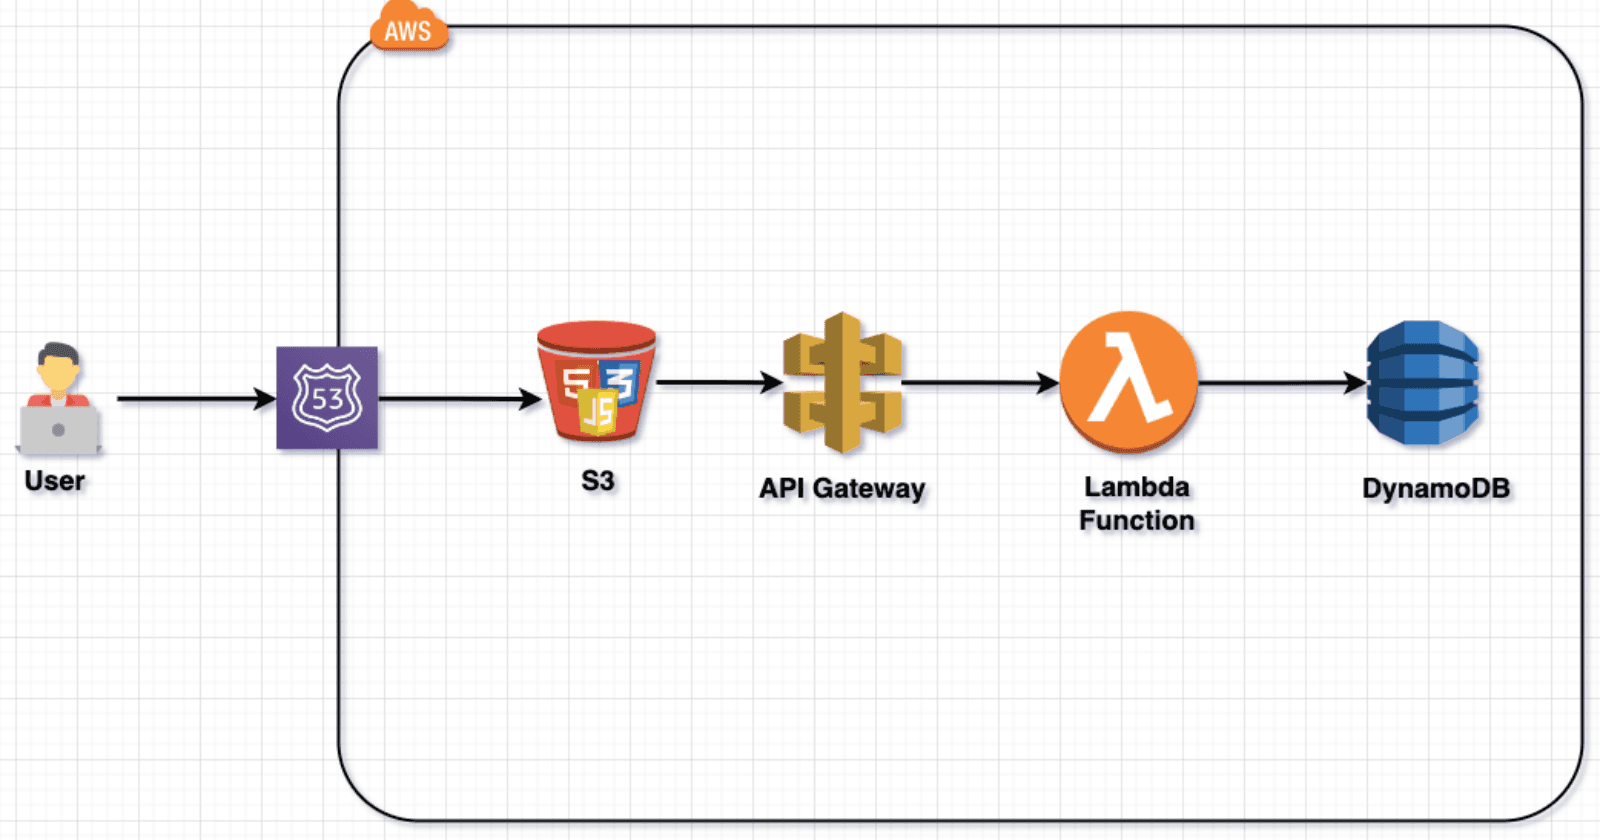
The ServerlessBlog project represents a paradigm shift in modern web development, leveraging AWS Lambda (Python), API Gateway, S3, and DynamoDB to create a seamlessly scalable and secure content management system. By adopting a serverless architecture, the project minimizes operational overhead, ensuring cost-efficiency and easy maintenance. This innovative approach enables automatic scaling based on demand, optimizing resource utilization. The use of DynamoDB as a NoSQL database ensures high-performance data storage and retrieval, while API Gateway safeguards communication between clients and serverless functions. Overall, ServerlessBlog addresses the challenges of traditional server-based systems, offering a flexible, low-maintenance, and cost-effective solution for dynamic content management.
Technologies Used in This Project:
AWS Lambda (Python): Utilized for serverless computing, allowing automatic scaling of functions in response to demand. Python was chosen for its readability, ease of integration, and extensive libraries, enhancing development speed and flexibility.
API Gateway: Serves as a secure and scalable entry point for the backend, facilitating communication between clients and serverless functions. It ensures efficient API management, authentication, and authorization, enhancing the overall project's security and accessibility.
Amazon S3: Employed for scalable and durable object storage, providing a reliable solution for storing and retrieving images. S3's high durability, low latency, and easy integration with other AWS services make it an optimal choice for managing and serving media content.
DynamoDB: Chosen as a NoSQL database to store and retrieve blog data with low-latency and high-throughput. DynamoDB's seamless scalability, low operational overhead, and consistent performance make it suitable for handling dynamic content and metadata in a serverless architecture.
Prerequisites:
Before diving into the ServerlessBlog project, ensure you have the following prerequisites in place:
AWS Account: A valid AWS account is necessary to leverage cloud services like Lambda, API Gateway, S3, and DynamoDB.
Domain Name: Obtain a domain name for your blog, as it will be essential for securing and accessing your ServerlessBlog through a custom web address.
Basic HTML, Bootstrap, and jQuery Knowledge: Familiarity with HTML for structuring web content, Bootstrap for responsive design, and jQuery for enhanced front-end interactivity is recommended for a smoother development experience.
Python Skills: Understanding of Python programming language is crucial as it powers the serverless functions implemented using AWS Lambda.
Project Overview:

Project:
We will be using this project repo: https://github.com/patelajay745/Serverless-Blog
Step-1 : Create Lambda function
Navigate to the Lambda service on the AWS console and click on "Create function."

Provide the name "ManageBlogPostFunction" and choose "Python 3.8" as the runtime.

Click "Create Function" to proceed.
Paste the provided code into the Lambda function editor.
Ensure to customize the values for "allowed_origin," "s3_name" (which will be created later for hosting the website and images), and "Access-Control-Allow-Origin."
import json
import boto3
import uuid
import base64
from datetime import datetime
from boto3.dynamodb.conditions import Key

dynamodb = boto3.resource('dynamodb')
table = dynamodb.Table('BlogPosts')
s3 = boto3.client('s3')
s3_name = '<ur s3 bucker name>'

def lambda_handler(event, context):

    print(event)
    http_method = event['httpMethod']

    request_origin = event['headers'].get('origin', '')
    allowed_origin = '<ur domain name>'

    print(f"request_origin: {request_origin}")

    if request_origin == allowed_origin:

        if http_method == 'GET':
            # Retrieve all blog posts

            response = table.scan()
            items = response.get('Items', [])

            # Sort the items by createdAt in descending order
            sorted_items = sorted(items, key=lambda x: x['createdAt'], reverse=True)

            return {
                'statusCode': 200,
                'headers': generate_cors_headers(),
                'body': json.dumps(sorted_items)
            }

        elif http_method == 'POST':
            # Create a new blog post with date and time
            data = json.loads(event['body'])
            post_id = str(uuid.uuid4())
            current_datetime = datetime.now().isoformat()

            fileExtension = data['extension']

            timestamp = str(int(datetime.now().timestamp())) + fileExtension

            decode_content = base64.b64decode(data['image'])

            s3_upload = s3.put_object(Bucket=s3_name, Key=timestamp, Body=decode_content)

            image_url = f"https://{s3_name}.s3.amazonaws.com/{timestamp}"  # Update with your S3 bucket URL

            table.put_item(
                Item={
                    'postId': post_id,
                    'title': data['title'],
                    'content': data['content'],
                    'createdAt': current_datetime,
                    'updatedAt': current_datetime,
                    'imageUrl': image_url
                }
            )
            return {
                'statusCode': 201,
                'headers': generate_cors_headers(),
                'body': json.dumps(f'{post_id} post created successfully!')
            }

        elif http_method == 'PUT':
            # Update an existing blog post with date and time
            data = json.loads(event['body'])
            post_id = event['queryStringParameters']['postId']
            if not post_id:
                return {
                    'statusCode': 400,
                    'headers': generate_cors_headers(),
                    'body': json.dumps('Missing postId parameter')
                }

            current_datetime = datetime.now().isoformat()

            # Check if there's a new image in the request
            if 'newImage' in data:
                # Upload the new image to S3
                file_extension = data['extension']
                timestamp = str(int(datetime.now().timestamp())) + file_extension
                decode_content = base64.b64decode(data['newImage'])

                # Delete the associated image from S3
                post = table.get_item(Key={'postId': post_id}).get('Item', {})
                if 'imageUrl' in post:
                    key = post['imageUrl'].split('/')[-1]
                    print(key)
                    s3.delete_object(Bucket=s3_name, Key=key)

                s3_upload = s3.put_object(Bucket=s3_name, Key=timestamp, Body=decode_content)
                image_url = f"https://{s3_name}.s3.amazonaws.com/images/{timestamp}"

                # Update the post with the new image URL
                table.update_item(
                    Key={'postId': post_id},
                    UpdateExpression='SET title = :title, content = :content, imageUrl = :imageUrl, updatedAt = :updatedAt',
                    ExpressionAttributeValues={
                        ':title': data['title'],
                        ':content': data['content'],
                        ':imageUrl': image_url,
                        ':updatedAt': current_datetime
                    }
                )
            else:
                # Update the post without changing the image
                table.update_item(
                    Key={'postId': post_id},
                    UpdateExpression='SET title = :title, content = :content, updatedAt = :updatedAt',
                    ExpressionAttributeValues={
                        ':title': data['title'],
                        ':content': data['content'],
                        ':updatedAt': current_datetime
                    }
                )

            return {
                'statusCode': 200,
                'headers': generate_cors_headers(),
                'body': json.dumps(f'{post_id} post updated successfully!')
            }

        elif http_method == 'DELETE':
            post_id = event['queryStringParameters']['postId']
            if not post_id:
                return {
                    'statusCode': 400,
                    'body': json.dumps('Missing postId parameter in the URL path')
                }

            # Delete the associated image from S3
            post = table.get_item(Key={'postId': post_id}).get('Item', {})
            if 'imageUrl' in post:
                key = post['imageUrl'].split('/')[-1]
                print(key)
                s3.delete_object(Bucket=s3_name, Key=key)

            table.delete_item(
                Key={'postId': post_id}
            )
            return {
                'statusCode': 200,
                'headers': generate_cors_headers(),
                'body': json.dumps(f'{post_id} post deleted successfully!')
            }
        else:
            return {
                'statusCode': 400,
                'headers': generate_cors_headers(),
                'body': json.dumps('Invalid HTTP method')
            }
    else:
        return {
                'statusCode': 400,
                'headers': generate_cors_headers(),
                'body': json.dumps('you are not authorized')
            }

def generate_cors_headers():
    return {
        'Access-Control-Allow-Headers': 'Content-Type',
        'Access-Control-Allow-Origin': 'http://ur domain name',
        'Access-Control-Allow-Methods': 'OPTIONS,GET,POST,PUT,DELETE'
    }
Navigate to the Configuration tab, then Permissions.


This action will redirect you to IAM. Click on "Add Permission" and proceed to attach policies.

Choose "S3FullAccess" and "DynamoDB" and then click on "Add Permission." Close this window.

Now, click on "Deploy" as one function is ready for use. We will proceed to create two more functions for usage.
Create Second Lambda function.
Navigate to the Lambda service on the AWS console and click on "Create function."

Provide the name "RetrieveBlogPostsFunction" and choose "Python 3.8" as the runtime.

Click "Create Function" to proceed.
Paste the provided code into the Lambda function editor.
Ensure to customize the values for "Access-Control-Allow-Origin."
import json
import boto3

dynamodb = boto3.resource('dynamodb')
table = dynamodb.Table('BlogPosts')

def lambda_handler(event, context):
    http_method = event['httpMethod']

    if http_method == 'GET':
        # Retrieve a specific blog post based on postId
        post_id = event['queryStringParameters']['postId']
        if not post_id:
            return {
                'statusCode': 400,
                'headers': generate_cors_headers(),
                'body': json.dumps('Missing postId parameter in the URL path')
            }

        response = table.get_item(Key={'postId': post_id})
        item = response.get('Item', {})
        return {
            'statusCode': 200,
            'headers': generate_cors_headers(),
            'body': json.dumps(item)
        }
    else:
        return {
            'statusCode': 400,
            'headers': generate_cors_headers(),
            'body': json.dumps('Invalid HTTP method')
        }

def generate_cors_headers():
    return {
        'Access-Control-Allow-Headers': 'Content-Type',
        'Access-Control-Allow-Origin': 'http://ur domain name',
        'Access-Control-Allow-Methods': 'OPTIONS,GET'
    }
Navigate to the Configuration tab, then Permissions.

This action will redirect you to IAM. Click on "Add Permission" and proceed to attach policies.
Choose "DynamoDB" and then click on "Add Permission." Close this window.

Now, click on "Deploy" as this function is ready for use. We will proceed to create last functions for login.
Create Last Lambda function.
Navigate to the Lambda service on the AWS console and click on "Create function."

Provide the name "Login" and choose "Python 3.8" as the runtime.

Click "Create Function" to proceed.
Paste the provided code into the Lambda function editor.
Ensure to customize the values for "Access-Control-Allow-Origin."
import json
import boto3

def lambda_handler(event, context):
    # Extract username and password from the query parameters

    print(event)
    username = event['queryStringParameters']['username']
    password = event['queryStringParameters']['password']

    # Check credentials against DynamoDB table
    is_authenticated = check_credentials(username, password)

    # Return a response indicating authentication status
    response = {
        'isAuthenticated': is_authenticated
    }

    return {
        'statusCode': 200,
        'headers': generate_cors_headers(),
        'body': json.dumps(response)
    }

def check_credentials(username, password):
    # Connect to DynamoDB
    dynamodb = boto3.resource('dynamodb')
    table = dynamodb.Table('login')  # Replace 'login' with your actual table name

    # Scan DynamoDB table for the provided username and password
    response = table.scan(
        FilterExpression='username = :u and password = :p',
        ExpressionAttributeValues={
            ':u': username,
            ':p': password
        }
    )

    # Check if a matching record was found
    return len(response['Items']) > 0


def generate_cors_headers():
    return {
        'Access-Control-Allow-Headers': 'Content-Type',
        'Access-Control-Allow-Origin': 'http://ur domain name',
        'Access-Control-Allow-Methods': 'OPTIONS,POST'
    }
Step 2 : Create API Gateway.
Navigate to API Gateway and click on "REST API." Click on "Build."

Provide a name for the API, such as "ServerlessBlogAPIGateway," and click on "Create API."

Then, click on "Create Resource," name it "Login," select "CORS," and click on "Create Resource."


Click on "Create method"

Choose "POST" as the Method type and "Lambda Function" as the Integration type. Select "Lambda Proxy Integration" and then choose the Lambda function "Login" from the list. Finally, click on "Create Method."

Click on "Create resource"

Provide name to resource "RetrieveBlogDetailsById". Enable "CORS" and click on "Create Resource"

Click on "Create Method" but make sure you create under "RetrieveBlogDetailsById" rersource

Choose "GET" as the Method type and "Lambda Function" as the Integration type. Select "Lambda Proxy Integration" and then choose the Lambda function "RetrieveBlogPostsFunction" from the list. Finally, click on "Create Method."

Click on "Create resource"
Provide name to resource "ManageBlogPost". Enable "CORS" and click on "Create Resource"

Click on "Create Method" but make sure you create under "ManageBlogPost" resource

Choose "GET" as the Method type and "Lambda Function" as the Integration type. Select "Lambda Proxy Integration" and then choose the Lambda function "ManageBlogPostFunction" from the list. Finally, click on "Create Method."

Let's Create one more method to create blog post . Click on "Create Method" but make sure you create under "ManageBlogPost" resource
Choose "POST" as the Method type and "Lambda Function" as the Integration type. Select "Lambda Proxy Integration" and then choose the Lambda function "ManageBlogPostFunction" from the list. Finally, click on "Create Method."

Let's Create one more method to update blog post . Click on "Create Method" but make sure you create under "ManageBlogPost" resource
Choose "PUT" as the Method type and "Lambda Function" as the Integration type. Select "Lambda Proxy Integration" and then choose the Lambda function "ManageBlogPostFunction" from the list. Finally, click on "Create Method."

Let's Create one more method to delete blog post . Click on "Create Method" but make sure you create under "ManageBlogPost" resource
Choose "Delete" as the Method type and "Lambda Function" as the Integration type. Select "Lambda Proxy Integration" and then choose the Lambda function "ManageBlogPostFunction" from the list. Finally, click on "Create Method."

Finally , your Resource and all method should look like this .

Click on "Deploy API"

Select "New stage"

provide name "dev" and click on "Deploy"

Our APIGateway is ready to use.Now it is time to setup DynamoDB.
Step 3 : Create DynamoDB table.
Navigate to the "Tables" section in the AWS Management Console under DynamoDB. Click on "Create table"

Provide name "login and partition key "username" and Click on "Create table"

Let's Create second table. Provide name "BlogPosts" and partition key "postId" and Click on "Create table"

We need to add a username and password entry to our login table. Click on the table name, then select "Action," and finally, click on "Create Item."

Enter the value of username and create on more attribute with name of "password". provide the value for password. Click on "Create item"

Step 3 : Create S3 bucket to host our website.
Navigate to the AWS S3 console and click on "Create bucket."

Enter the exact domain name as the Bucket name.

Accessible to the public by deselecting "Block all public access."

Click on "Create bucket". Click on the newly created bucket's name. Navigate to "Permissions."

Click on Edit button for Bucket policy.

write this bucket policy and don't forgot to update resource ARN
{
    "Version": "2012-10-17",
    "Id": "Policy1707666026999",
    "Statement": [
        {
            "Sid": "Stmt1707666025128",
            "Effect": "Allow",
            "Principal": "*",
            "Action": "s3:GetObject",
            "Resource": "<Bucket arn>/*"
        }
    ]
}

Click on "save changes". Now you can see your bucket is public.

Click on "Properties"

Click on "Edit" under Static website hosting"

"Enable" static website hosting. and write "index.html" and click "Save Changes"

Step 4 : Upload website to bucket.
Before uploading website to s3 , we need to update all the url of api gateway in code.
First get your API gateway URL.
Navigate to API gateway in console. Click on API name. Click on "Stages"

Copy somewhere your Invoke URL, we will use this later.

Clone this repository. https://github.com/patelajay745/Serverless-Blog.git
In website folder, open following files,
add-post.html , edit-post.html , index.html . Search for "fetch(" and paste your api gateway Invoke url.
fetch('<ur invoke url>/ManageBlogPost', {

For edit-post.html
fetch('<ur invoke url>/ManageBlogPost?postId=${postId}', {

for index.html
fetch('<ur invoke url>/ManageBlogPost', {

Now change to show-post.html
fetch('<ur invoke url>/RetrieveBlogDetailsById?postId=${postId}', {

Now at last, make 3 changes in admin.html
search for "amazonaws"
fetch('<ur invoke url>/ManageBlogPost', {

fetch('<ur invoke url>/ManageBlogPost?postId=${postId}', {

<ur invoke url>login?username=
Here make sure you enter login instead of ManageBlogPost

Now Go to S3 bucket . Click on "Upload"

To upload all files you need to click on "Add files" and for upload "Asset" folder you need to click "Add folder"

make sure you upload assets/ folder otherwise our website will look messy without css.

Feel free to test your index.html; however, please note that it won't display any posts due to our CORS restrictions, limited to our domain URL. Nonetheless, you can preview the appearance of our website.

Step 5 : Setup DNS for domain in Route53
Navigate to Route 53 and Click on your domain name.

Click on "Create record"

Write "www" if you are not using sub domain. I am using subdomain so I am writing subdomain name.
Select "A Record" as Record type.
Select "Alias".
Choose Endpoint to "Alias to 53 website endpoint"
Choose region to "Region of S3 bucket"
Your s3 Endpoint will pop up.
Click on "Create Records"

Make sure you entered right allowed origin name to your domain name in All Lambda function.

Also Access-Control-Allow-Origin to your domain name. It will block your API access to your domain name only.

Now access your Serverless blog by visiting your domain name.
Now you can create new blog by clicking Adminpanel .
Default username is admin and password is admin.

Great! Your Serverless blog is now set up!
For added security, we have configured the Lambda function to match the origin, ensuring that only requests from our specified domain can access the API Gateway.
Conclusion 🚀:
In this ServerlessBlog project, we've harnessed the power of AWS Lambda, API Gateway, S3, and DynamoDB to create a dynamic and scalable content management system. 💻 Leveraging Python in Lambda functions ensures readability and flexibility, while DynamoDB and S3 provide efficient data storage and retrieval. 🗄️ API Gateway acts as the gateway, ensuring secure communication between clients and serverless functions. 🌐
Following the step-by-step guide, we've set up the entire infrastructure, including DynamoDB tables, S3 buckets, and API Gateway, ensuring seamless deployment and management. 🛠️ By incorporating CORS and tailored permissions, we've enhanced security. 🛡️ The provided website, hosted on S3, demonstrates the real-time capabilities of our ServerlessBlog.
Stay tuned for more as we explore further advancements, including SAM integration and CI/CD implementation! 🌈✨ The journey continues towards a fully optimized and robust serverless architecture. 🚀🌐🔒


