Project 16: Jenkins Driven: CI/CD for Amazon Clone with Monitoring Excellence(Step By Step Implementation)
Introduction:
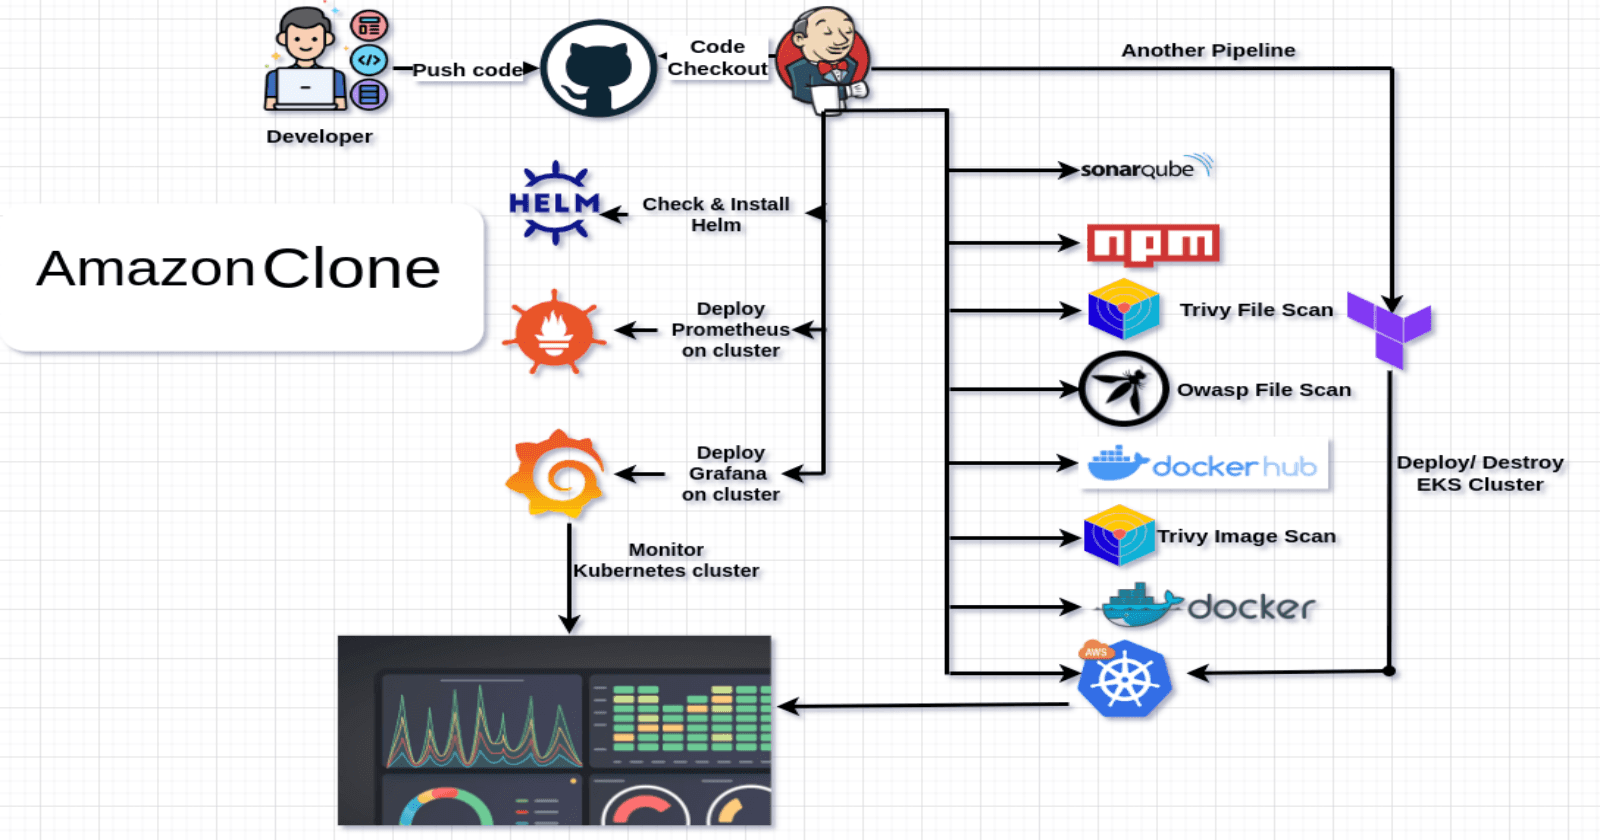
Step into the world of "Jenkins Driven: CI/CD for Amazon Clone with Monitoring Excellence" – a guide that shows how to make an Amazon-like app easily. 🚀 We use Jenkins to make it all smooth – from starting with Amazon's resources, setting up things with Terraform, to putting it all together with Docker and Kubernetes. But wait, there's more! We've added Grafana and Prometheus for keeping a close eye on your app. 🌐 This step-by-step guide makes sure your Amazon-style app is safe and works great, taking you from writing code to making it live. 🛠️💻 Join in, and let's make your Amazon Clone together!
Technologies Used in This Project:
Jenkins: Automate your workflow! Jenkins orchestrates the entire process, ensuring seamless integration and continuous delivery, making your Amazon Clone development faster and more efficient.
Terraform: Meet Terraform – your infrastructure magician. It conjures up AWS resources effortlessly, making the setup of your Amazon Clone environment a breeze.
Docker: Containerization at its best! Docker wraps up your Amazon Clone app, making it portable and easy to deploy across different environments – a key player in ensuring consistency and efficiency.
Kubernetes: Enter Kubernetes, the deployment maestro. It manages your Docker containers, ensuring they run smoothly in your environment, providing scalability and reliability for your Amazon Clone.
Grafana: Visualize, monitor, and excel! Grafana offers insights into your Amazon Clone's performance, ensuring you're always in the loop, and your app is running at its best.
Prometheus: Meet Prometheus – your vigilant guardian. It keeps a watchful eye on your Amazon Clone, collecting and analyzing metrics, ensuring the health and reliability of your application.
Project Overview:

Project:
GITHUB REPO: https://github.com/patelajay745/Amazon-FE.git
Step 1 : Launch Ec2 Instance with Ubnuntu AMI and t2.large type. I have used following terraform file to launch it.
provider "aws" {
  region = "us-east-2" # Change this to your desired AWS region
}

resource "aws_instance" "my_instance" {
  count = 1


  ami                    = "ami-05fb0b8c1424f266b" # Specify the AMI ID for your desired Amazon Machine Image
  instance_type          = "t2.large"
  key_name               = "admin-ajay" # Change this to your key pair name
  vpc_security_group_ids = [aws_security_group.terraform-instance-sg.id]


  tags = {
    Name = "Jenkins_Server"
  }
 //for storage
  root_block_device {
    volume_size = 30
  }


}

output "jenkins_public_ip" {
    value = [for instance in aws_instance.my_instance : instance.public_ip]

}


#Create security group
resource "aws_security_group" "terraform-instance-sg" {
  name        = "terraform-created-sg"
  description = "Allow inbound ports 22, 8080"
  vpc_id      = "vpc-0a35a83de5d6649ab"

  ingress = [
    for port in [22, 80, 443, 8080, 9000, 3000,9090,4000] : {
      description      = "inbound rules"
      from_port        = port
      to_port          = port
      protocol         = "tcp"
      cidr_blocks      = ["0.0.0.0/0"]
      ipv6_cidr_blocks = []
      prefix_list_ids  = []
      security_groups  = []
      self             = false
    }
  ]

  #Allow all outbound requests
  egress {
    from_port   = 0
    to_port     = 0
    protocol    = "-1"
    cidr_blocks = ["0.0.0.0/0"]
  }
}
Step 2 : Create an IAM role for the newly created EC2 instance.
Navigate to IAM Roles and click on "Create Role."

Select "EC2" as the use case and proceed to the next step. Search for "AdministratorAccess" (for learning purposes) and click "Next."

Provide a name for the role and click "Create Role."
Now, attach the role to the EC2 instance. Choose the instance, then go to Actions > Security > Modify IAM role.

Select the created role from the list and click on "Update IAM role."

Step 3: Install Required packages.
Install the required packages by SSHing into the EC2 instance.
Create two scripts, namely "jenkins-docker.sh" and "other-packages.sh"
#!/bin/bash
sudo apt update -y
sudo apt install fontconfig openjdk-17-jre -y
java -version
sudo wget -O /usr/share/keyrings/jenkins-keyring.asc \
  https://pkg.jenkins.io/debian-stable/jenkins.io-2023.key
echo deb [signed-by=/usr/share/keyrings/jenkins-keyring.asc] \
  https://pkg.jenkins.io/debian-stable binary/ | sudo tee \
  /etc/apt/sources.list.d/jenkins.list > /dev/null
sudo apt-get update -y
sudo apt-get install jenkins -y
sudo systemctl enable jenkins
sudo systemctl start jenkins

#install docker
# Add Docker's official GPG key:
sudo apt-get update
sudo apt-get install ca-certificates curl gnupg -y
sudo install -m 0755 -d /etc/apt/keyrings
curl -fsSL https://download.docker.com/linux/ubuntu/gpg | sudo gpg --dearmor -o /etc/apt/keyrings/docker.gpg
sudo chmod a+r /etc/apt/keyrings/docker.gpg

# Add the repository to Apt sources:
echo \
  "deb [arch=$(dpkg --print-architecture) signed-by=/etc/apt/keyrings/docker.gpg] https://download.docker.com/linux/ubuntu \
  $(. /etc/os-release && echo "$VERSION_CODENAME") stable" | \
  sudo tee /etc/apt/sources.list.d/docker.list > /dev/null
sudo apt-get update
sudo apt-get install docker-ce docker-ce-cli containerd.io docker-buildx-plugin docker-compose-plugin -y
sudo usermod -aG docker ubuntu
newgrp docker
#!/bin/bash
# install trivy
sudo apt-get install wget apt-transport-https gnupg lsb-release -y
wget -qO - https://aquasecurity.github.io/trivy-repo/deb/public.key | gpg --dearmor | sudo tee /usr/share/keyrings/trivy.gpg > /dev/null
echo "deb [signed-by=/usr/share/keyrings/trivy.gpg] https://aquasecurity.github.io/trivy-repo/deb $(lsb_release -sc) main" | sudo tee -a /etc/apt/sources.list.d/trivy.list
sudo apt-get update
sudo apt-get install trivy -y
#install terraform
sudo apt install wget -y
wget -O- https://apt.releases.hashicorp.com/gpg | sudo gpg --dearmor -o /usr/share/keyrings/hashicorp-archive-keyring.gpg
echo "deb [signed-by=/usr/share/keyrings/hashicorp-archive-keyring.gpg] https://apt.releases.hashicorp.com $(lsb_release -cs) main" | sudo tee /etc/apt/sources.list.d/hashicorp.list
sudo apt update && sudo apt install terraform
#install Kubectl on Jenkins
sudo apt update
sudo apt install curl -y
curl -LO https://dl.k8s.io/release/$(curl -L -s https://dl.k8s.io/release/stable.txt)/bin/linux/amd64/kubectl
sudo install -o root -g root -m 0755 kubectl /usr/local/bin/kubectl
kubectl version --client
#install Aws cli
curl "https://awscli.amazonaws.com/awscli-exe-linux-x86_64.zip" -o "awscliv2.zip"
sudo apt-get install unzip -y
unzip awscliv2.zip
sudo ./aws/install

#install helm.
curl -fsSL -o get_helm.sh https://raw.githubusercontent.com/helm/helm/master/scripts/get-helm-3
chmod 700 get_helm.sh
./get_helm.sh
Execute both scripts using the following command.
chmod 777 jenkins-docker.sh
chmod 777 other-packages.sh
./jenkins-docker.sh
./other-packages.sh
Verify the installation of all packages.
docker --version
trivy --version
aws --version
terraform --version
helm version
kubectl version

Grant executable permissions for docker.sock and initiate the Docker container for SonarQube.
sudo chmod 777 /var/run/docker.sock
docker run -d --name sonar -p 9000:9000 sonarqube:lts-community

Step 4: Establish a connection between Jenkins and SonarQube.
Copy the IP address of the EC2 instance and paste it into the browser.
<Ec2-ip:8080>
It will prompt for a password.

Retrieve the password and complete the installation.

Jenkins Dashboard.

Now access SonarQube using:
<ec2-ip:9000>
It will ask for the default username and password. Enter "admin" in both.
The SonarQube dashboard will look like this.

Step 5: Terraform Configuration and EKS Provisioning
Now, navigate to Jenkins and add the Terraform plugin to facilitate the AWS EKS provisioning through the Pipeline Job.
Follow these steps:
- Access the Jenkins dashboard –> Manage Jenkins –> Plugins.

- In the Available Plugins section, search for "Terraform" and install it.
To determine the path to Terraform, you can use the following command in terminal(Ec2 SSH):
which terraform

Navigate back to the Jenkins dashboard and follow these steps to add Terraform to the tools:

Find the section for adding tools, and look for Terraform in the list.
Add Terraform, specifying the name and the path to the Terraform executable on your system (the path you obtained using the which terraform command).

Modify the S3 bucket name in the backend.tf file. If you have forked the Git repository, navigate to the EKS_terraform folder and make the necessary changes. Update the S3 bucket name according to your preferences or project requirements. This ensures that Terraform uses the correct backend configuration for storing its state files.

Create a new Jenkins job for provisioning Amazon EKS. This job will be responsible for managing the deployment and configuration of your EKS cluster.

I aim to incorporate build parameters to facilitate the application and destruction processes during the build phase exclusively. Please include the following configuration inside the job, as depicted in the image below.


Pipeline Code:
pipeline{
    agent any
    stages {
        stage('Checkout from Git'){
            steps{
                git branch: 'main', url: 'https://github.com/patelajay745/Amazon-FE.git'
            }
        }
        stage('Terraform version'){
             steps{
                 sh 'terraform --version'
             }
        }
        stage('Terraform init'){
             steps{
                 dir('EKS') {
                      sh 'terraform init'
                   }
             }
        }
        stage('Terraform validate'){
             steps{
                 dir('EKS') {
                      sh 'terraform validate'
                   }
             }
        }
        stage('Terraform plan'){
             steps{
                 dir('EKS') {
                      sh 'terraform plan'
                   }
             }
        }
        stage('Terraform apply/destroy'){
             steps{
                 dir('EKS') {
                      sh 'terraform ${action} --auto-approve'
                   }
             }
        }
    }
}

Click "Save," then proceed to "Build with Parameters." Choose "apply" and click "Build."

The EKS provisioning process will take some time. If everything is configured correctly, the status will resemble the image below.

Now check created resource in AWS console.


Step 6: Plugin Installation and Setup (Java, Sonar, Node.js, OWASP, Docker)
Navigate to the Jenkins dashboard.
Go to "Manage Jenkins" → "Plugins" → "Available Plugins."
Search for the following plugins:
Eclipse Temurin Installer
SonarQube Scanner
NodeJS
OWASP Dependency-Check
Docker
Docker Commons
Docker Pipeline
Docker API
Docker Build Step

Step 7: Configuration of Global tools.
Navigate to "Manage Jenkins" → "Tools" → Install JDK(17) and Node.js(16) → Click on "Apply and Save."


For SonarQube:

For Owasp:


For Docker:

Click on "Apply and Save."Step 8: Configure Sonar Server in Manage Jenkins
Retrieve the Public IP Address of your EC2 Instance. Since SonarQube operates on Port 9000, access it via <Public IP>:9000.
Visit your SonarQube Server, navigate to Administration → Security → Users, click on Tokens, update the token by assigning it a name, and then generate the token.


Enter name of token then click on "Generate"

Copy the token, then go to the Jenkins Dashboard → Manage Jenkins → Credentials → Add Secret Text. The entry should resemble this.


Now, Navigate to Dashboard → Manage Jenkins → System and Add like the below image.


Click on "Apply and Save."
In the Sonarqube Dashboard, also include a quality gate by navigating to Administration → Configuration → Webhooks.

Click on "Create"
In URL Section:
<http://jenkins-public-ip:8080>/sonarqube-webhook/>

Now, integrate Docker credentials into Jenkins for logging in and pushing the image:
Navigate to Manage Jenkins → Credentials → Global → Add Credential.
Provide DockerHub Username and Password under Global Credentials.

Step 9: Pipeline up to Docker
Now, let's create a new job for our pipeline.

Add Following script in pipeline section.
pipeline{
    agent any
    tools{
        jdk 'jdk17'
        nodejs 'node16'
    }
    environment {
        SCANNER_HOME=tool 'sonar-scanner'
    }
    stages {
        stage('clean workspace'){
            steps{
                cleanWs()
            }
        }
        stage('Checkout from Git'){
            steps{
                git branch: 'main', url: 'https://github.com/patelajay745/Amazon-FE.git'
            }
        }
        stage("Sonarqube Analysis "){
            steps{
                withSonarQubeEnv('sonar-server') {
                    sh ''' $SCANNER_HOME/bin/sonar-scanner -Dsonar.projectName=Amazon \
                    -Dsonar.projectKey=Amazon'''
                }
            }
        }
        stage("quality gate"){
           steps {
                script {
                    waitForQualityGate abortPipeline: false, credentialsId: 'Sonar-Token'
                }
            }
        }
        stage('Install Dependencies') {
            steps {
                sh "npm install"
            }
        }
        stage('OWASP FS SCAN') {
            steps {
                dependencyCheck additionalArguments: '--scan ./ --disableYarnAudit --disableNodeAudit', odcInstallation: 'DP-Check'
                dependencyCheckPublisher pattern: '**/dependency-check-report.xml'
            }
        }
         stage('TRIVY FS SCAN') {
            steps {
                sh "trivy fs . > trivyfs.txt"
            }
        }
        stage("Docker Build & Push"){
            steps{
                script{
                   withDockerRegistry(credentialsId: 'docker', toolName: 'docker'){
                       sh "docker build -t amazon ."
                       sh "docker tag amazon patelajay745/amazon:latest "
                       sh "docker push patelajay745/amazon:latest "
                    }
                }
            }
        }
        stage("TRIVY"){
            steps{
                sh "trivy image patelajay745/amazon:latest > trivyimage.txt"
            }
        }
        stage("deploy_docker"){
            steps{
                sh "docker stop amazon || true"  // Stop the container if it's running, ignore errors
                sh "docker rm amazon || true"
                sh "docker run -d --name amazon -p 4000:3000 patelajay745/amazon:latest"
            }
        }
    }
}
Click on "Apply and Save."
Click on "Build Now"

Now see the reports on SonarQube dashboard.


When you log in to Dockerhub, you will see a new image is created
Step 10: Deployment on EKS
SSH to Jenkins server and enter following command:
aws eks update-kubeconfig --name <CLUSTER NAME> --region <CLUSTER REGION>
aws eks update-kubeconfig --name EKS_CLOUD --region us-east-2

Get config file using following code.
cat ~/.kube/config

Copy it and save it in a document or another folder, naming it secret-file.txt.
Note: Create a file named secret-file.txt in your file explorer, store the configuration within it, and utilize it in the Kubernetes credential section.
Now install required plugin for kubernates in Jenkins.
Go to "Manage Jenkins" → "Plugins" → "Available Plugins."
Search for the following plugins:

Navigate to Manage Jenkins → Credentials → Global → Add Credential.

Add another Stage into pipeline to deploy on the Kubernetes cluster.
stage('Deploy to Kubernetes') {
            steps {
                script {
                    dir('K8S') {
                        withKubeConfig(caCertificate: '', clusterName: '', contextName: '', credentialsId: 'k8s', namespace: '', restrictKubeConfigAccess: false, serverUrl: '') {
                            // Apply deployment and service YAML files
                            sh 'kubectl apply -f deployment.yml'
                            sh 'kubectl apply -f service.yml'

                            // Get the external IP or hostname of the service
                            def externalIP = sh(script: 'kubectl get svc amazon-service -o jsonpath="{.status.loadBalancer.ingress[0].hostname}"', returnStdout: true).trim()

                            // Print the URL in the Jenkins build log
                            echo "Service URL: http://${externalIP}/"
                        }
                    }
                }
            }
        }
Find Weburl from Jenkins Console output.
If you dont get url in Jenkins Console then you can run following command on terminal.
kubectl get svc amazon-service -o jsonpath={.status.loadBalancer.ingress[0].hostname}

Access on web browser.

Final pipeline.

Step 11: Setup Monitoring on cluster
Create new pipeline.

Pipeline code:
pipeline{
    agent any

    stages {
        stage('Setup') {
            steps {
                script {
                    // Add Helm repositories
                    sh 'helm repo add stable https://charts.helm.sh/stable'
                    sh 'helm repo add prometheus-community https://prometheus-community.github.io/helm-charts'
                }
            }
        }
        stage('Deploy Prometheus') {
            steps {
                script {

                        withKubeConfig(caCertificate: '', clusterName: '', contextName: '', credentialsId: 'k8s', namespace: '', restrictKubeConfigAccess: false, serverUrl: '') {

                           // Check if the namespace 'prometheus' exists
                                def namespaceExists = sh(script: 'kubectl get namespace prometheus', returnStatus: true) == 0

                                // If the namespace doesn't exist, create it and install Prometheus using Helm
                                if (!namespaceExists) {
                                    sh 'kubectl create namespace prometheus'
                                    sh 'helm install stable prometheus-community/kube-prometheus-stack -n prometheus'
                                } else {
                                    echo 'Namespace prometheus already exists.'
                                }


                        }

                }
            }
        }
        stage('Patch Services') {
            steps {
                script {
                    withKubeConfig(caCertificate: '', clusterName: '', contextName: '', credentialsId: 'k8s', namespace: '', restrictKubeConfigAccess: false, serverUrl: '') {

                    // Patch Prometheus service to use ClusterIP
                    sh 'kubectl patch svc stable-kube-prometheus-sta-prometheus -n prometheus --type=json -p=\'[{"op":"replace","path":"/spec/type","value":"LoadBalancer"}]\''

                    // Patch Grafana service to use ClusterIP
                    sh 'kubectl patch svc stable-grafana -n prometheus --type=json -p=\'[{"op":"replace","path":"/spec/type","value":"LoadBalancer"}]\''
                     }
                }
            }
        }

        stage('Get Service URLs') {
            steps {
                script {
                    withKubeConfig(caCertificate: '', clusterName: '', contextName: '', credentialsId: 'k8s', namespace: '', restrictKubeConfigAccess: false, serverUrl: '') {

                    // Get the external IP or hostname of the service
                   def prometheus = sh(script: 'kubectl get svc stable-kube-prometheus-sta-prometheus -n prometheus -o jsonpath="{.status.loadBalancer.ingress[0].hostname}"', returnStdout: true).trim()

                     // Get the external IP or hostname of the service
                   def grafana = sh(script: 'kubectl get svc stable-grafana -n prometheus -o jsonpath="{.status.loadBalancer.ingress[0].hostname}"', returnStdout: true).trim()


                     echo "Service URL for prometheus: http://${prometheus}:9090"
                      echo "Service URL for grafana : http://${grafana}/"
                    }
                }
            }
        }
    }


}

Click on "Save". and "Build Now"

Find Weburl for grafana and premethus from Jenkins Console output.
If you dont get url in Jenkins Console then you can run following command on terminal.
kubectl get svc stable-kube-prometheus-sta-prometheus -n prometheus -o jsonpath="{.status.loadBalancer.ingress[0].hostname}"

#for grafana url
kubectl get svc stable-grafana -n prometheus -o jsonpath="{.status.loadBalancer.ingress[0].hostname}"
To open promethus url in browser you need to attach ":9090/targets" at end of url.

To open grafana url you might need to wait for a while.

Enter user name "admin" and password "prom-operator"
Click on "+" on right hand side and then click on import dashboard as shown in below screenshot.

Enter "15661" and click on "Load"

Then choose "prometheus" as source and Click on "Import"

Here you go. Your dashboard is ready.

You can import dashboard as per your requirement from this site. https://grafana.com/grafana/dashboards/
Step 12: Destroy EKS cluster when your done with project.

Don't Forget to Destroy Terraform created Ec2 instance for Jenkins server.
Conclusion
Building an app like Amazon with Jenkins has been exciting! 🚀 Jenkins helps smoothly put together Amazon's virtual world, like arranging blocks. It makes sure everything works well, and we've added special guards, Grafana and Prometheus, to watch over the app. 🌐 This guide takes you through each step, making sure your Amazon-like app is safe and works great, from writing code to making it live. 🛠️💻 Let's celebrate this success and make your Amazon Clone even better!


