Event Bubbling and Capturing: How Events Travel Through the DOM
Have you ever wondered how clicking a button on a webpage can trigger a series of actions, like changing text, showing a menu, or submitting a form? This magic is made possible by something called events in web development. Events are the backbone of interactivity on the web, allowing users to engage with content in dynamic ways.
In this blog, we’ll dive deep into the world of events, specifically focusing on how they travel through the Document Object Model (DOM) via processes known as event bubbling and capturing. By the end, you’ll have a solid understanding of these concepts and how to use them to create more interactive and efficient web applications. Let’s start with the basics!
What Are Events?
In web development, events are actions or occurrences that happen in the browser—things like clicking a button, hovering over an element, scrolling the page, or submitting a form. These events are crucial because they enhance user interaction, making websites feel alive and responsive rather than static pages of text and images.
When an event occurs, the browser notifies your code, and you can respond to it by defining an event listener. This allows you to execute specific actions—like displaying a message or updating the page—based on what the user does.
A Simple Example: Clicking a Button
To make this concrete, let’s look at a basic example: clicking a button to change some text on the page. Here’s the HTML and JavaScript:
<button id="myButton">Click me</button>
<p id="myParagraph">Original text</p>
document.getElementById('myButton').addEventListener('click', function () {
  document.getElementById('myParagraph').textContent = 'Text changed!';
});
When you click the button, the click event is triggered, and the event listener updates the paragraph’s text from "Original text" to "Text changed!". This simple interaction showcases how events connect user actions to code responses. But what happens when elements are nested, and events need to travel through multiple layers? That’s where event bubbling and capturing come in.
Understanding the DOM and Event Propagation
The Document Object Model (DOM) is a tree-like structure that represents the HTML elements of a webpage. For example, consider this HTML:
<div id="parent">
  <div id="child">Click me</div>
</div>
In the DOM, this forms a hierarchy: the parent div contains the child div. When an event occurs—like clicking the child div—it doesn’t just affect that element. The event propagates, or travels, through the DOM, potentially triggering listeners on related elements.
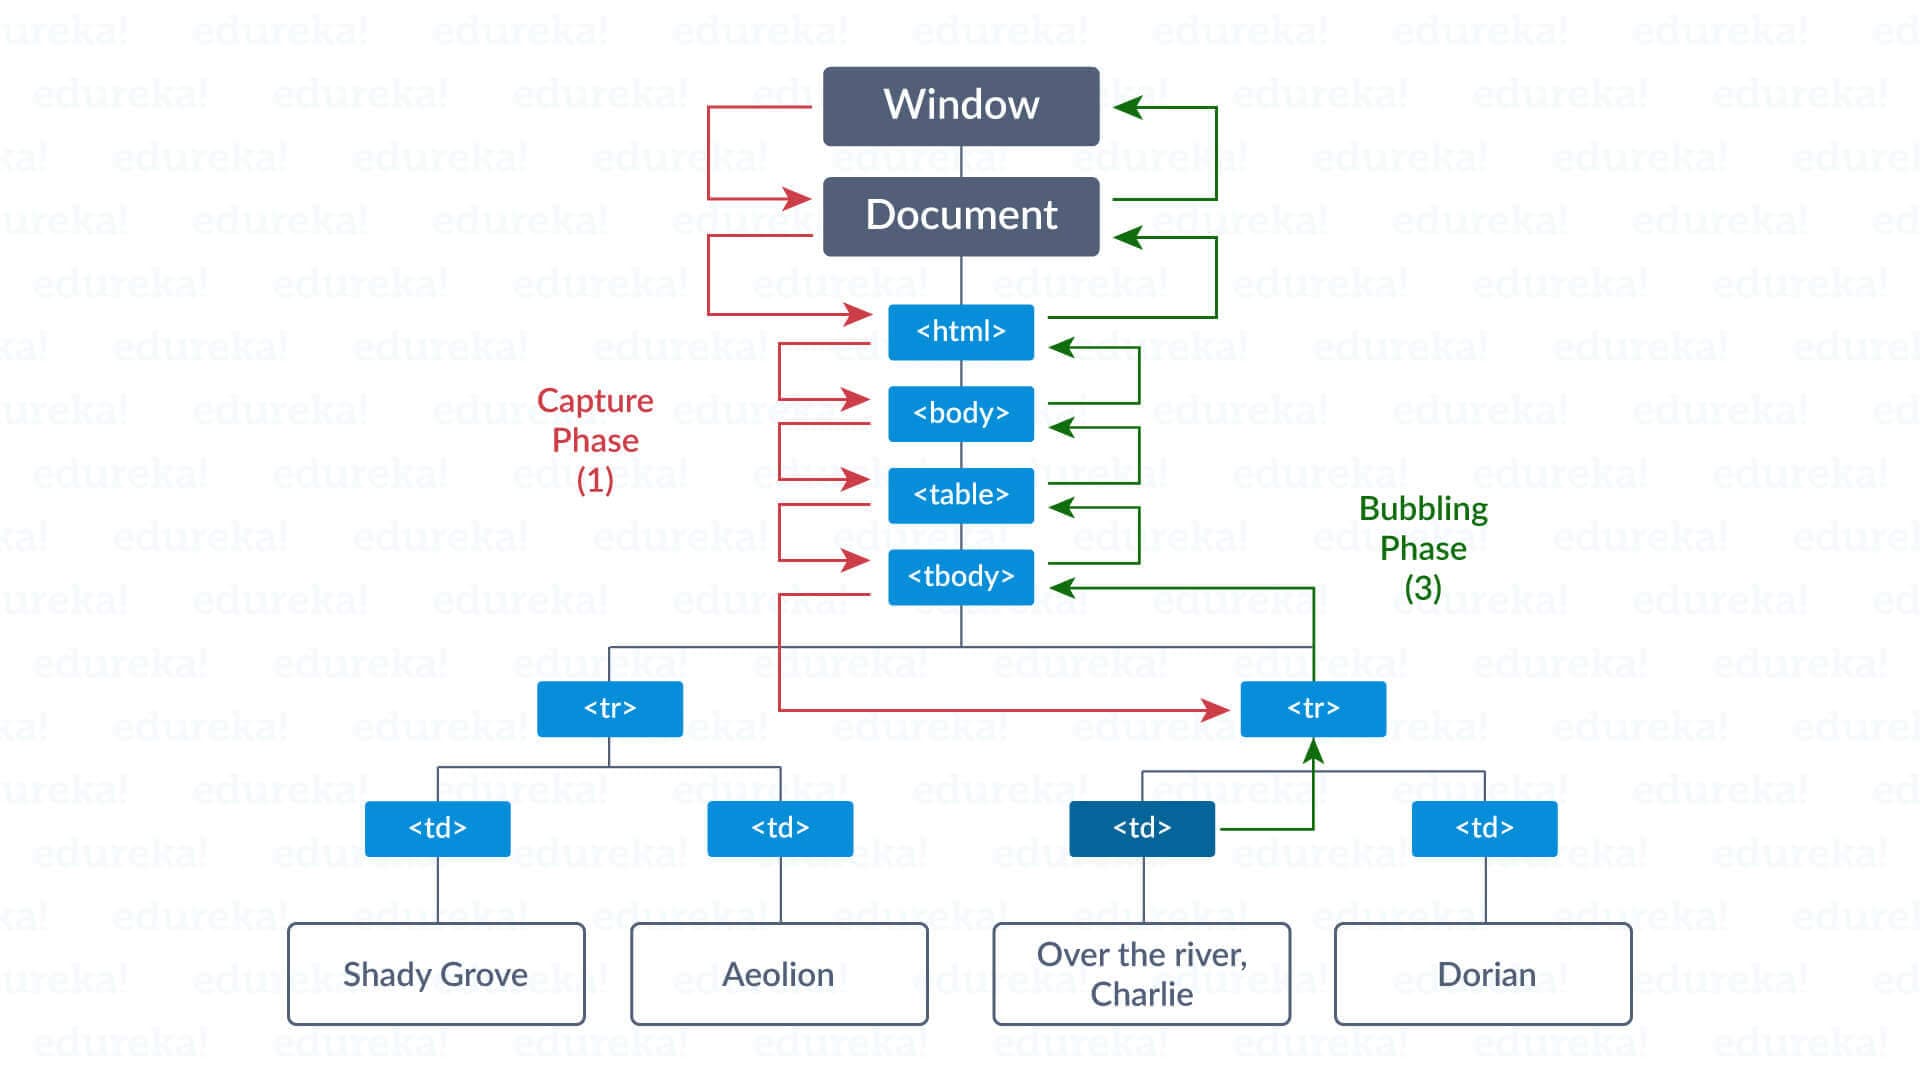
Event propagation happens in three phases:
Capturing Phase: The event starts at the root of the DOM (the document) and travels down to the target element.
Target Phase: The event reaches the element where it originated (the child div in our example).
Bubbling Phase: The event travels back up from the target to the root.
Let’s explore these phases in detail.
Event Capturing Explained
Capturing (also called the "trickling" phase) is the first stage of event propagation. The event begins at the top of the DOM tree and moves downward to the target element. Imagine a signal being sent from the document through each ancestor until it reaches the element where the event occurred.
For example, in our nested divs, if you click the child div, the capturing phase would go:
- document → html → body → parent → child
You can listen for events during the capturing phase by setting the third argument of addEventListener to true. Here’s an example:
document.getElementById('parent').addEventListener(
  'click',
  function () {
    console.log('Parent capturing');
  },
  true // Use capturing phase
);

document.getElementById('child').addEventListener(
  'click',
  function () {
    console.log('Child clicked');
  },
  false // Default: bubbling phase
);
If you click the child div, the output would be:
Parent capturing
Child clicked
The parent listener fires first because it’s in the capturing phase, catching the event as it travels down to the child.
Event Bubbling Explained
After the capturing and target phases, we enter the bubbling phase. Here, the event starts at the target element and bubbles up to the root of the DOM. This is the default behavior for most events, like click.
Using the same HTML, let’s attach bubbling listeners:
document.getElementById('parent').addEventListener(
  'click',
  function () {
    console.log('Parent bubbling');
  },
  false // Bubbling phase (default)
);

document.getElementById('child').addEventListener(
  'click',
  function () {
    console.log('Child clicked');
  },
  false
);
Clicking the child div outputs:
Child clicked
Parent bubbling
The event triggers on the child first (the target), then bubbles up to the parent. This is why bubbling is so intuitive—it follows the natural hierarchy of nested elements.
Not all events bubble, though. For example, focus and blur events don’t bubble, but they do participate in the capturing phase.
Demonstrating Propagation with Both Phases
Let’s combine capturing and bubbling to see the full propagation path:
document.getElementById('parent').addEventListener(
  'click',
  function () {
    console.log('Parent capturing');
  },
  true
);

document.getElementById('child').addEventListener(
  'click',
  function () {
    console.log('Child clicked');
  },
  false
);

document.getElementById('parent').addEventListener(
  'click',
  function () {
    console.log('Parent bubbling');
  },
  false
);
Clicking the child div logs:
Parent capturing
Child clicked
Parent bubbling
This shows the complete journey: down during capturing, at the target, and back up during bubbling.
Stopping Event Propagation
Sometimes, you don’t want an event to propagate further. For example, if clicking a button inside a div shouldn’t trigger the div’s click handler, you can stop propagation using the stopPropagation() method.
Modify the child listener:
document.getElementById('parent').addEventListener(
  'click',
  function () {
    console.log('Parent capturing');
  },
  true
);

document.getElementById('child').addEventListener(
  'click',
  function (event) {
    console.log('Child clicked');
    event.stopPropagation();
  },
  false
);

document.getElementById('parent').addEventListener(
  'click',
  function () {
    console.log('Parent bubbling');
  },
  false
);
Clicking the child now outputs:
Parent capturing
Child clicked
The Parent bubbling message doesn’t appear because stopPropagation() in the target phase prevents the bubbling phase from continuing. However, the capturing phase already happened, so that listener still fires.
To stop the event earlier, you could call stopPropagation() in the capturing phase:
document.getElementById('parent').addEventListener(
  'click',
  function (event) {
    console.log('Parent capturing');
    event.stopPropagation();
  },
  true
);
Now, only "Parent capturing" logs, as the event never reaches the child or triggers bubbling.
A practical use case might be a modal dialog with a close button. Stopping propagation on the button’s click ensures the modal background’s click handler (e.g., to close the modal) isn’t triggered unintentionally.
Event Delegation: A Powerful Technique
Event delegation leverages bubbling to handle events efficiently. Instead of attaching listeners to every child element, you attach one to a parent and let events bubble up. This is especially useful for dynamic content.
Consider a list with delete buttons:
<ul id="myList">
  <li>Item 1 <button class="delete">Delete</button></li>
  <li>Item 2 <button class="delete">Delete</button></li>
  <li>Item 3 <button class="delete">Delete</button></li>
</ul>
document.getElementById('myList').addEventListener('click', function (event) {
  if (event.target.classList.contains('delete')) {
    const li = event.target.parentElement;
    li.remove();
  }
});
Clicking a delete button removes its list item. The event bubbles up to the ul, and the listener checks if the clicked element (event.target) is a delete button. This approach is efficient and works even if you add new list items dynamically—no need to attach new listeners!
Event.target vs. Event.currentTarget
Understanding the difference between event.target and event.currentTarget is key:
event.target: The element where the event originated (e.g., the delete button).
event.currentTarget: The element the listener is attached to (e.g., the ul).
In the delegation example, logging these values:
document.getElementById('myList').addEventListener('click', function (event) {
  console.log('Target:', event.target);
  console.log('CurrentTarget:', event.currentTarget);
  if (event.target.classList.contains('delete')) {
    event.target.parentElement.remove();
  }
});
Clicking a delete button logs the button as target and the ul as currentTarget. This distinction helps you target the right element in your code.
Advanced: addEventListener Options
The addEventListener method takes three arguments: event type, listener function, and an optional third parameter. By default, it’s false (bubbling), but setting it to true enables capturing. You can also pass an options object:
element.addEventListener('click', handler, { capture: true, once: true });
capture: true: Use capturing phase.
once: true: The listener fires once and is then removed.
These options offer fine-tuned control over event handling.
Conclusion
Events are fundamental to creating interactive web experiences. Understanding how they propagate through the DOM via capturing and bubbling allows you to control and optimize your event handling. Whether you’re stopping propagation to prevent unwanted actions or using delegation for efficiency, these techniques are essential tools in a web developer’s toolkit.
I hope this blog has clarified these concepts for you. Now, go ahead and experiment with them in your next project—try building something interactive and watch how events bring it to life!


